Most commentary on chess games (including my own commentary) seems to assume that the reader has considerable chess knowledge. This article, in contrast, attempts to provide explanations that might satisfy even readers who are fairly new to the game. I have assumed knowledge only of the rules, of each square's being designated by letter/number, of the relative value of the pieces, and of the need to generally not remain behind in material. Terms often found in chess writings are in italics and used in contexts that hopefully allow the reader to understand them.
This article discusses the rationale for Black's moves in the game Marchand–Levin (1984 National Chess Congress). That game has also been presented, with comparatively brief commentary, in the "Annotated Games" section of this website.
1. d4 d5
This move prevents White from safely playing 2. e4, for that move could be met by 2...dxe4. 1...Nf6 would be another way to inhibit 2. e4. If White could with impunity place pawns at the d4- and e4-squares, he would have a substantial space advantage in the center. (To see how "space advantage" is defined and why it's often advantageous, see parts 1 and 2 of "To Plan for the Middlegame, Read the Pawn Structure", both of which are posted at this website.)
2. c4 dxc4
The idea behind 2. c4 was to play 3. cxd5 so as to dilute Black's control of the e4-square, and to meet the natural recapture 3...Qxd5 by 4. Nc3, which not only would attack the queen (thus forcing Black to retreat that piece rather than trying to bring out other pieces) but would control the e4-square and thereby facilitate its occupation by White's e-pawn.
Black could have maintained firm control of the e4-square by playing 2...e6 or 2...c6, either of which would allow Black, in reply to 3. cxd5, to recapture at the d5-square with a pawn. Yet Black has voluntarily yielded control of the e4-square by playing 2...dxc4. This works because 3. e4 could be met by 3...e5, threatening ...exd4 to exchange one of White's center pawns and thereby dilute White's control of the center. After 3...e5, White could not play 4. dxe5 with impunity, because 4...Qxd1+ 5. Kxd1 would coax White's king to where it interferes with the deployment of other White pieces.
After 2...dxc4 3. e4, another possibility would be 3...b5, hoping to retain an extra pawn to compensate for White's superior pawn center. Then 4. b3 would threaten the c4-pawn. Since defending it by 4...Ba6 or 4...Be6 would permit Black's c4-pawn to be isolated after 5. bxc4 (after which he could hardly expect to prevent its capture indefinitely), Black would try 4...cxb3. White would then have three possible captures: 5. Bxb5+, 5. axb3, and 5. Qxb3.
5. Bxb5+ (after 2...dxc4 3. e4 b5 4. b3 cxb3) intends to gain time for White to recapture the b3-pawn, but 5...c6 spoils this idea by attacking the bishop and thus giving Black time for 6...bxa2, retaining the extra pawn.
After 5. axb3, 5...a6 would only appear to protect the b-pawn, for the a-pawn would be pinned against Black's a8-rook and therefore constrained from capturing the bishop after 6. Bxb5+. But 5...c6 would protect the b-pawn.
5. Qxb3 would permit even 5...a6, since the a-file remains closed.
Since 4. b3 (after 2...dxc4 3. e4 b5) doesn't appear to work, perhaps White could undermine Black's chain of pawns by instead attacking its base at the b5-square, through the move 4. a4. Then 4...bxa4 would subject both the a4- and c4-pawns to rapid capture, 4...b4 would permit 5. Bxc4, and 4...a6 would again leave Black unable to recapture after 5. axb5. There remains 4...c6 (after 4. a4), after which 5. axb5 cxb5 6. b3 would regain the pawn after 6...cxb3 7. Bxb5+ (for Black no longer has a c-pawn with which to block the check), followed by capturing the b3-pawn.
Therefore, it appears that Black could not have remained a pawn ahead after 2...dxc4 3. e4 b5.
3. Qa4+ Nc6
This way of blocking the check keeps White's d-pawn under attack (by Black's queen), but White could easily defuse this by playing 4. e3. With White's d-pawn protected by another pawn, Black's attacking it solely with pieces would be ineffectual because taking the pawn would give up at least three points in return. As long as Black's pressure along d-file is stymied, posting a rook on that file would be pointless. So then, how can Black alter the pawn structure so that his rooks can be useful?
Black needs to attack the d-pawn with one of his own pawns in addition to using pieces. This would involve playing ...c5 or ...e5, at which point White may exchange pawns by dxc5... (or dxe5...) or permit Black to exchange them by ...cxd4 (or ...exd4). In any of these cases, Black's rooks would have access to at least one file that's unobstructed by any pawns.
To this end, 3...Nc6 prepares an eventual ...e5, at the cost of inhibiting ...c5 (because 3...Nc6 blocks Black's c-pawn).
3...Nd7 would have prepared either ...c5 or ...e5, but would have blocked Black's light-square bishop.
3...Bd7 would have attacked White's queen, but 4. Qxc4 was likely White's intent anyway. Also, 3...Bd7 would deprive Black's knight of the d7-square. Were Black to follow 3...Bd7 by ...Nc6, this would make 3...Nc6 seem better because it would retain the option of deploying the light-square bishop to a square other than d7.
3...c6 would not have helped Black achieve ...c5 or ...e5. Moreover, with Black's knight denied the c6-square, it would have had to go to the d7-square to support ...e5 (which makes 3...Nd7 seem better than 3...c6, because the former would permit ...c5, ...c6, or refraining from moving the c-pawn at all).
4. Nf3 Nf6
Playing 4. Nf3 to protect the d-pawn renewed White's threat to play e4... Hence Black inhibited that move by playing 4...Nf6. 4...Bf5 was another way to control the e4-square, but it's not clear that this bishop is posted best at the f5-square. In contrast, posting the knight at the f6-square seems a standout. From there, it controls the e4-square and has potential access to more squares than it would from the e7-square (after Black's e-pawn would have moved) or from the h6-square.
5. e3 e6
This prepares ...Bd6, from where the bishop would complement the c6-knight in controlling the e5-square and facilitating ...e5. The pawn's reaching the e5-square in two moves consumes more time than doing so in one move, but the latter just isn't feasible here.
Another way for that bishop to control the e5-square would be to play ...g6 and ...Bg7, followed by moving the f6-knight (in order to unsheath the bishop). But moving that knight would yield control of the e4-square, even after ...Ne4 (because a piece controls only the squares to which it can move, not the square it currently occupies).
6. Bxc4 Bd6
6...Bb4+ would seem inconsistent with Black's plan of preparing ...e5, but I've found that checks, captures, and moves that threaten to capture should always be examined because of how they constrain the opponent's replies.
Of White's possible replies to 6...Bb4+, 7. Nc3 seems the most natural, for reasons akin to the rationale behind Black's earlier moves 3...Nc6 and 4...Nf6. After 7. Nc3, Black could further attack the pinned knight by 7...Nd5 or 7...Ne4, threatening to win at least a piece by 8...Nxc3 (because recapturing by 9. bxc3 would cause White's king and rook to be forked after 9...Bxc3+). But 7...Nd5 would also threaten to exchange White's c4-bishop by 8...Nb6 9. Qb3 (9. Qb5 would fail to 9...a6, forcing the queen to abandon protection of the bishop) 9...Nxc4 10. Qxc4.
Were White's light-square bishop exchanged, he would be left with a bishop that's impeded by his center pawns' being on dark squares. He might be able to increase the bishop's mobility by advancing one or both center pawns, but this would likely lead to additional pawn exchanges. Pawns' leaving the board tends to benefit bishops more than knights, and Black would still have both bishops.
However, after 6...Bb4+ 7. Nc3 Nd5, White could defuse both the material threat (8...Nxc3) and the positional threat (8...Nb6) by a queen retreat such as 8. Qc2, after which 8...Nb6 could be answered simply by retreating White's light-square bishop.
Because 7. Nc3 seems an entirely adequate reply to 6...Bb4+, it can be concluded that against proper play by White, 6...Bb4+ offers Black no advantage over 6...Bd6.
7. O-O O-O
7...Bd7 would have threatened 8...Nxd4 (the knight's being immune to capture because of the light-square bishop's discovered attack on White's queen). But White could have avoided this by 8. Qc2. Hence, 7...Bd7 would have merely coaxed White's queen to a better spot, from where it controls the e4-square and thereby facilitates the advance e4... by White.
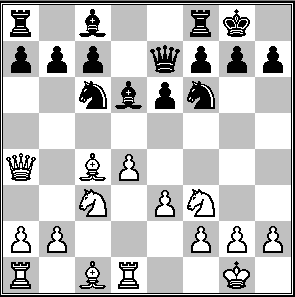
8. Rd1 Qe7
White's eighth move created a latent pin of Black's dark-square bishop. This would have become evident after 8...e5 9. dxe5 Nxe5 10. Nxe5, when 10...Bxe5 would permit 11. Rxd8 (and refraining from 10...Bxe5 would leave Black down a piece).
To enable ...e5, Black needed to remove his queen from the d-file. But I had intended 8...Qe7 even had White not played 8. Rd1, because having the queen at the e7-square allows the alignment of Black's queen and dark-square bishop that comes about at move twelve.
9. Nc3
9...a6
White threatened to exchange Black's dark-square bishop by 10. Nb5 followed by 11. Nxd6. The justification for 9...a6 is not simply that 10. Nb5 would be met by 10...axb5, for this capture would open the a-file and allow 11. Qxa8. But then Black could play 11...bxc4, obtaining two minor pieces for a rook.
10. Qc2 e5
After 10...b5 (which should be examined because it's "threatening"), the bishop could retreat in four ways: 11. Bb3, 11. Bd3, 11. Be2, or 11. Bf1. 11. Bb3 would permit that piece's exchange by 11...Na5, for the bishop would have nowhere to go. Likewise, 11. Bd3 would permit 11...Nb4 and the exchange of the bishop (after White's queen moved out of harm's way).
Of the remaining retreats (11. Be2 or 11. Bf1), the first would give the bishop more potential scope because the e2-square is on the d1/h5 diagonal, which consists of more squares than does the f1/h3 diagonal (which would be accessible from the f1-square). So, let's examine 11. Be2 and set aside White's alternatives for now.
Black would then have three threatening moves: 11...Nxd4, 11...b4, or 11...Nb4. 11...Nxd4 would simply invite the knight's capture, say by 12. exd4 (which would maintain control over the e5-square while opening the c1/h6 diagonal for White's dark-square bishop).
11...b4 would invite 12. Na4, for although a knight's mobility is reduced as it approaches the edge of the board, White's knight at the a4-square would help control the c5-square. This would inhibit ...c5, the move that would allow Black to rid himself of the c-pawn, which is a target along the c-file in part because the b-pawn has advanced much too far to be able to defend it.
There remains 11...Nb4 (after 10...b5 11. Be2), after which White's queen may escape to either the b3-square or the b1-square. Of the two, 12. Qb3 seems more "active," so we'll start with that. Now, 12...e5 would be much less appealing than at move 10 because after 13. dxe5, Black no longer would have a knight that could recapture at the e5-square.
However, thanks to the fact that 11...Nb4 unblocks the c-pawn, Black might answer 12. Qb3 with 12...c5, to exchange this pawn before it can become a target. As Black would then threaten to win material by 13...c4 14. Qa3 Nc2 (forking White's queen and rook), White would seem to have nothing better than 13. dxc5. Black would reply 13...Bxc5 and seem to have a satisfactory position.
Although we've examined only some of the possibilities stemming from 10...b5, it seems evident that this move was worth exploring. This would, however, have taken considerably more time than I was willing to invest during the game, especially with my having aimed for ...e5 from as far back as move three.
11. dxe5 Nxe5
11...Nb4 would have immediately lost material to 12. exd6. If Black then were to play 12...Nxc2, White would reciprocate by 13. dxe7. Continuing in the same vein by 13...Nxa1 would be met by 14. exf8(Q)+, when 14...Kxf8 would still leave White ahead by a bishop.
In the position reached by 11...Nxe5, the exchange of White's d-pawn for Black's e-pawn has fully opened the d-file, thus creating two disconnected groups of pawns (of both players): those on the a- through c-files (on the queenside) and those on the e- through h-files (on the kingside). On the kingside, White has more pawns than Black, giving White a pawn majority there.
A pawn majority that consists of connected, undoubled pawns is generally more conducive to being advanced than if both sides have the same number of pawns on a given wing, because such a pawn majority will have at least one pawn that is unopposed by an enemy pawn and whose safe advance could ultimately result in a passed pawn. Such a pawn is an eventual candidate for promotion.
At the moment, White's e-pawn is a candidate on the kingside, and Black's c-pawn is a candidate on the queenside (where Black has a pawn majority). Each player would prefer to advance his own majority while obstructing the opponent's majority.
12. Nxe5 Qxe5
Black's threat of 13...Qxh2+ cannot be thwarted by 13. h3, as then 13...Qh2+ 14. Kf1 Qh1+ 15. Ke2 Qxg2 would win a pawn and leave White's king vulnerable. Therefore, White must block the h2/b8 diagonal with a pawn, which will weaken the squares that the pawn formerly controlled. For example, 13. g3 would concede control of the f3- and h3-squares by a White pawn (thus making them holes), requiring White to take care that Black pieces do not advantageously occupy those squares.
Considering the above and the long open diagonal for Black's light-square bishop, I felt comfortable with Black at this point.
13. f4 Qh5
Having provoked the advance of White's f-pawn and the consequent creation of holes along the e-file, I belatedly realized the need to obstruct White's e- and f-pawns. Their advance, if permitted, would give White a space advantage, which would likely allow him to post his pieces aggressively for an attack.
13...Qh5 is meant to exploit the lack of defending pieces near White's king. Black intends to meet 14. e4 by 14...Bc5+. Then 15. Kf1 would allow 15...Qxh2, and 15. Kh1 would run into 15...Ng4, threatening 16...Qxh2 mate or 16...Nf2+ and the gain of material.
Another way to try to obstruct White's majority is 13...Qc5, which pins the e-pawn and threatens either 14...Bxf4 (exploiting that pin) or 14...Qxc4. White could enable his queen to protect the c4-bishop by moving the knight, but to also save the f-pawn would require that the knight either defend the f-pawn directly (achieved by 14. Nd5 or 14. Ne2) or threaten something more valuable than the f-pawn (achieved by 14. Na4 or Ne4, either of which would attack Black's queen).
Of those four alternative knight moves (14. Nd5, 14. Ne2, 14. Na4, 14. Ne4), 14. Ne2 and 14. Na4 are the most suspect because they would place the knight where it has little purpose except to meet Black's threats. In contrast, 14. Nd5 or 14. Ne4 would further centralize the knight and provoke the exchange of Black's knight, a key defender of the e4-square.
14. Nd5 would have threatened to expose Black's king by 15. Nxf6+ gxf6. Hence Black would probably have replied 14...Nxd5. Then White's only safe recapture would be 15. Rxd5 because the pin against White's bishop would inhibit 15. Bxd5. Black could then save his queen by playing 15...Qb4, 15...Qa7, 15...Qb6, or 15...Qc6.
15...Qb4 would threaten to invade by 16...Qe1+, but White could avoid that simply by 16. Bd2, bringing that piece out while creating a threat (with tempo) and compelling 16...Qb6. Then 17. f5 would stifle the development of Black's light-square bishop and remove the f-pawn from attack, at the cost of making White's e-pawn backward and weakening the h2/b8 diagonal. If at move fifteen Black were to instead reply 15...Qa7, 15...Qb6, or 15...Qc6, White might still have continued with 16. f5.
So, 13...Qc5 apparently would have been no less risky for Black than the actual move, 13...Qh5.
14. Nd5
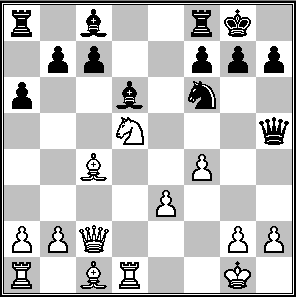
14...Ne4
This move, which blockades the e-pawn, exploits an overload of White's queen, in that 15. Qxe4 would permit 15...Qxd1+.
White might try to break the blockade by playing 15. Rd4. Black's trying to maintain it by 15...f5 would lose Black's queen to 16. Nf6+ (double check). 15...Bf5 would lose material to 16. Rxe4 Bxe4 17. Qxe4, and even though White's undeveloped pieces would be tied up after 17...Qd1+ 18. Kf2, the pin of the c1-bishop could soon be relieved by Rb1..., for then the rook would be protected by White's queen.
In reply to 15. Rd4, Black had intended 15...Nc5, with the surprising idea of meeting 16. e4 by 16...Nxe4. Then 17. Rxe4 would permit 17...Bf5, whereas 17. Qxe4 would permit 17...Bc5. In either case, the resulting pin of the rook would enable Black to obtain rook + pawn for bishop + knight, but just as important are that the candidate of White's pawn majority (that is, the e-pawn) would be eliminated and that both the d- and e-files would be devoid of pawns and invite occupation by rooks (of which Black would have one more than White).
However, after 15. Rd4 Nc5 16. e4 Nxe4 17. Qxe4 Bc5, White can unpin the rook with the developing move 18. Be3. After 18...Bxd4 19. Bxd4, White's centralized queen and minor pieces are poised to create threats on either wing. An indication of their power is that the natural 19...Bf5 could be refuted by either of two ways. One would be to win the bishop by 20. Ne7+ and 21. Nxf5.
The more complex alternative of 20. Qe5 (after 15. Rd4 Nc5 16. e4 Nxe4 17. Qxe4 Bc5 18. Be3 Bxd4 19. Bxd4 Bf5) would have left Black without an adequate defense to the threatened 21. Qxg7 mate. Blocking the diagonal by 20...f6 would have lost Black's queen to 21. Nxf6+. Nor would defending the g-pawn have helped: 20...Qg6 would lose the queen to the fork 21. Ne7+; 20...Qh6 would abandon protection of the bishop and allow 21. Qxf5; 20...Qg4 would allow 21. Nf6+, and were Black to save his queen by replying 21...gxf6, then 22. Qxf6 would carry the devastating threat of 23. Qh8 mate.
This suggests that Black's plan of ...e5 was too ambitious. Perhaps he should have been content to play for ...c5 instead, as discussed in the commentary to move ten.
15. Be2 Bg4
This way of parrying the threat 16. Bxh5 develops the bishop while pinning White's e2-bishop against his rook, thereby compelling the exchange of bishops and weakening White's control over the light squares in his position.
16. Bxg4 Qxg4
Black now intended to answer 17. h3 by 17...Qh5, and 18. g4 by 18...Qxh3, for 19. Qxe4 would allow 19...Qxg4+, forking White's king and rook.
17. Rd4 f5
This move, which reinforces the blockade, is possible now that White lacks a discovered check along the a2/g8 diagonal.
18. Nxc7 Rac8
Black prepares to invade along the file that White has just opened. 19. Rc4, intending 19...Bxc7 20. Rxc7 Rxc7 21. Qxc7, would lose to Qd1 mate. This illustrates the harm being done by the dormancy of White's a1-rook.
19. Qb3+ Kh8
19...Rf7 would have self-pinned that rook, immobilizing it. Although the confinement of Black's king to the back rank after 19...Kh8 creates the potential for being mated by a White queen or rook (a major piece) along that rank, this scenario seems hard to imagine in light of the present placement of the two sides' pieces.
20. Ne6

20...Qe2
This move, made possible by White's having earlier weakened his light squares (the e2-square being among them), initiates tactics that ultimately either gain material or mate. The threat of 21...Qe1 mate allows Black to temporarily ignore the attack on his f8-rook.
21. Qd1 Qf2+
White's queen is passively placed due to her having to respond to threats brought about by the activity of Black's queen and other pieces. Therefore, Black should exchange queens only upon deciding that progress cannot be made otherwise.
22. Kh1 Rc2
This time, the threat of 23...Qxg2 mate inhibits White from playing 24. Nxf8.
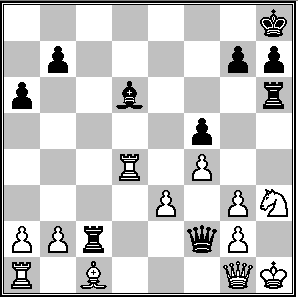
23. Qg1 Rf6
The threat to White's knight allows Black to ungrudgingly permit the exchange of queens, for 24. Qxf2 would be refuted by 24...Nxf2+ 25. Kg1 Rxe6, gaining a piece and also protecting Black's bishop.
24. Ng5 Ng3+
The risk of a miscalculation in making this sacrifice was minimal because the entire combination consists of checks, which severely constrained the possible replies I had to anticipate.
25. hxg3 Rh6+
To justify sacrificing a minor piece for no pawns in return, there needs to be a compelling follow-up, which often begins with threatening the king or a major piece.
26. Nh3
26...Rxh3+
0-1
White resigned, as he would be mated after 27. gxh3 Qf3+.