A position where one of a player's pieces is attacked tends to constrain the set of moves that are worth considering. How a player might examine them and then select one will be illustrated using a position from an old game of mine in which I might have maintained the advantage if I had utilized the type of thinking presented here.
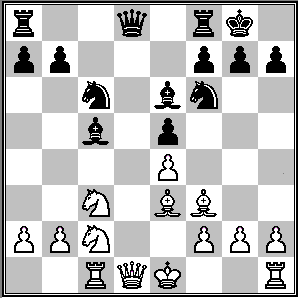
The position in question is shown below. It's from the 1976 New Shrewsbury (NJ, USA) Junior. Lenny Tillis (1804) was White, and David Levin (1793) was Black. White has just played 15. B(d2)e3.
For readability, the moves under consideration by Black are grouped under five headings.
I. Exchanging the bishop
Black's c5-bishop is attacked. Exchanging it by 15...Bxe3 16. Nxe3 would bring White's knight to where it controls the d5-square, while unclogging the c-file and the a4-d1 diagonal for White. So, 15...Bxe3 should be set aside.
II. Interleaving a check
Black could defer having to meet the attack on the bishop by playing 15...Qxd1+. But Black's queen currently has much more mobility than White's, which suggests that Black should not expend a tempo to exchange queens unless Black gains as a result. If White were to do so at the d8-square, this would bring a Black rook into play by recapturing. So, there doesn't seem to be a compelling need for Black to exchange queens or to avoid their exchange.
III. Moving another unit to control the c5-square
Protecting the bishop with 15...b6 would create holes at the a6- and c6-squares.
Protecting it by 15...Nd7 would reduce control of the d5-square and block the open d-file.
Protecting it by moving the queen, as in 15...Qa5, would free the d8-square for Black rook. We'll first examine 16. Bxc5 because if that isn't satisfactory for Black, there would be no need to examine other queen moves that defend the bishop, being that all presumably would transpose after 16...Qxc5. White might use the now-vacant e3-square to play 17. Ne3. Then 17...Rfd8 18. Ncd5 would discover on Black's queen while threatening to weaken Black's kingside by 19. Nxf6+ gxf6. After 18...Qa5+ 19. Qd2 Qxd2+ 20. Kxd2, Black could win a pawn by 20...Nb4 (hitting both the pinned knight and the a-pawn), but this would let White's rook invade at the c7-square, giving White some compensation.
IV. Moving the bishop to where it's defended or not attacked
Retreating with 15...Bd6 or 15...Be7 would temporarily concede the g1/a7 diagonal to White's e3-bishop.
15...Bb4 would threaten 16...Bxc3+ 17. bxc3 Bxa2. If 16. Nxb4, then 16...Nxb4 would attack the a-pawn a second time and threaten 17...Nd3+. But 17. O-O Nxa2 18. Nxa2 Bxa2 19. b3 would trap the bishop. Whether Black would have a viable way to release it is unclear.
15...Bb6 would remain on that diagonal but would fail to contribute to Black's development.
15...Bd4 would continue contesting the g1/a7 diagonal and would threaten 16...Bxc3+ 17. bxc3 Bxa2. White's exchanging the bishop by 16. Nxd4 exd4 would subject White to a fork. 16. Bxd4 exd4 would attack the protector of the a-pawn. 16. Nd5 would block the a2/g8 diagonal but would be attacked three times and defended only twice. 16. a3 would weaken the b3-square, whereas 16. Ra1 would deactivate that piece. So, 15...Bd4 seems to extract a concession from White.
V. Interposition at the d4-square
15...Nd4 would threaten to obtain the two bishops by 16...Nxf3+. But White's light-square bishop, although it helps control the d5-square, has little mobility, and 16. O-O Nxf3+ 17. Qxf3 would leave Black without a clear followup. 17...Bg4 wouldn't quite trap the queen, because of 18. Qg3.
Which Move to Select
Of the moves examined above, 15...Bd4 seems best. It carries a tactical threat, remains on the a7/g1 diagonal, and avoids creating a hole.
How This Analysis Could Be Improved
The above analysis did not exhaust all reasonable moves. For example, 15...Nb4 would allow regaining the piece after 16. Bxc5, by 16...Nd3+ and 17...Nxc5. White might instead play 16. Nxb4 Bxb4, as the elimination of the c2-knight spares White the need to redeploy it. In that case, the position isn't as good for Black as the one reached by 15...Bd4. Still, overlooking a move like 15...Nb4 might have cost in a different position.
That analysis was also shallower than desired. For example, after 15...Bd4 16. Nxd4 exd4, White could apparently save the piece by playing 17. e5!, hitting the f6-knight and threatening 18. Bxc6 to remove a defender of the d-pawn. Black would be fortunate that this oversight doesn't cost, for 17...dxe3 followed by 18...exf2+ would retain an edge.
Nonetheless, many players would achieve better results if they were to undertake the kind of analysis presented above, despite its limitations.
The Game Continuation
In the game, Black played 15...Bxe3 16. Nxe3 Qb6, intending to then move a rook to the d8-square. However, White replied 17. Ned5. Rather than enter complications after 17...Qxb2 18. Rb1 Qa3 19. Rb3 or 18. Nxf6+ gxf6, Black tried 17...Bxd5 18. exd5 Nd4, but his advantage was more difficult to exploit than it would have been after 15...Bd4.
Here is the complete score of the game. It ended when White, who was in extreme time pressure, accepted a draw offer.
1. d4 Nf6 2. c4 c5 3. Nf3 cxd4 4. Nxd4 e6 5. Nc3 Bb4 6. Bd2 O-O 7. e3 d5 8. Bd3 e5 9. Nc2 Bc5 10. cxd5 Nxd5 11. Be4 Nf6 12. Bf3 Nc6 13. Rc1 Bf5 14. e4 Be6 15. Be3 Bxe3 16. Nxe3 Qb6 17. Ned5 Bxd5 18. exd5 Nd4 19. b3 Rad8 20. O-O Qa5 21. Re1 Rfe8 22. Be4 Nb5 23. Na4 Qb4 24. Qd3 Nd4 25. Nc3 Qd6 26. Qg3 b5 27. Qd3 Nxe4 28. Nxe4 Qxd5 29. Rc5 Qd7 30. Ng5 g6 31. h4 Qe7 32. Rcxe5 Qxe5 33. Rxe5 Rxe5 34. Qh3 Re1+ 35. Kh2 Ne2 36. Qf3 Rd7 37. Qa8+ Kg7 38. Qe8 Rb7 39. Qe4 Rd7 1/2