(In writing my comments on this game, I've assumed that the reader understands the ideas that are covered in my e-book Chess Strategy for Children.)
1. e4 c5 2. c3
White plans to play 3. d4 and maintain his central-pawn duo even if Black replies 3...cxd4, because White then can play 4. cxd4.
2...d5 3. exd5 Qxd5
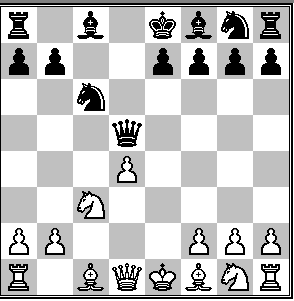
By trading White's e-pawn, Black has prevented White from creating a central-pawn duo. Black's queen, although in the center, is not that easy for White to attack. White's c-pawn is at c3, which makes 4. Nc3 illegal. If White plays 4. c4, Black's queen can simply move away. Then with White's c-pawn at c4, where it no longer protects the d4-square, it would be harder for White to advance his d-pawn to the fourth rank.
Compare this to 1. e4 c5 2. Nf3 d5 3. exd5 Qxd5, after which 4. Nc3 would bring a piece out while attacking Black's queen.
4. d4 cxd4
This move may seem bad because it makes it easy for White's c-pawn to leave the c3-square and for White's b1-knight to then go to that square, but Black has a plan against that.
5. cxd4 Nc6
If White now protects the d-pawn by 6. Nf3, Black can further attack it by playing 6...e5. For White to answer with 7. dxe5 would lead to 7...Qxd1+ 8. Kxd1, after which White's king could never castle.
After 6. Nf3 e5, White's d-pawn would be attacked three times and defended only twice. But White can still ignore this and play 7. Nc3 to attack Black's queen. Then 7...Bb4 would stop the attack by pinning the knight, while bringing out ("developing") another Black piece. White could "break the pin" by playing 8. Bd2. To avoid retreating the queen, Black could eliminate White's c3-knight by playing 8...Bxc3. White might answer 9. Bxc3, intending next to trade his d-pawn for Black's e-pawn, in order to unblock his dark-square bishop. Therefore, Black would play 9...e4 to avoid that pawn trade.
This shows how having Black's queen in the center helped Black attack White's center pawns. But it's usually risky to bring one's queen to the center so early in a game.
Decades before this game, I had read about the sequence just discussed (1. e4 c5 2. c3 d5 3. exd5 Qxd5 4. d4 cxd4 5. cxd4 Nc6 6. Nf3 e5 7. Nc3 Bb4 8. Bd2 Bxc3 9. Bxc3 e4), and I decided to play it as Black in future games where my opponent played the White moves of that sequence. But even if I didn't know about this sequence, I probably still would have thought of 2...d5 because I'd want to prevent White from getting a central-pawn duo.
6. Nc3

This was a surprise. I thought that Black had played soundly thus far and therefore that it should be bad for White to give up his d-pawn. The disadvantage to Black in capturing the d-pawn is that White will be able to bring pieces out faster than Black can, which will enable White to keep attacking Black's chessmen. But I realized that White's attack would stop in about half a dozen moves.
6...Qxd4 7. Be3 Qxd1+
Exchanging queens leaves White without his queen to attack with. It also leaves Black without his queen to defend with. But an attacking piece usually has more places to safely move to than a defending piece does, which makes trading queens here good for Black.
8. Rxd1
White's last three moves have brought pieces out, while Black's last two moves have been with his queen. It's easy to see that this lead in development would enable White to attack. One concern for Black is how to meet 9. Nd5 or 9. Nb5, either of which would threaten to fork by 10. Nc7+.
8...e5! (the exclamation point means "good move")
If now 9. Nd5, Black can defend the c7-square by 9...Bd6. I liked playing 8...e5 because it would be good even if I didn't need to quickly protect the c7-square.
9. Nb5 Bb4+
Since 9...Bd6 would simply lose the bishop to 10. Nxd6+, Black needed a different way for the bishop to control the c7-square.
If now 10. Bd2, Black could play 10...Bxd2+ to get rid of another White attacking piece. White could capture the bishop by 11. Kxd2 or 11. Rxd2, but 11. Kxd2 seems worse because it would block the rook from controlling squares along the d-file. After 11. Rxd2, Black can avoid the fork at the c7-square by moving either his king or rook. I'd have played 11...Rb8 because it would preserve the ability to castle if White decided not to check with the knight. Then Black would still be a pawn ahead and no longer be in danger.
White's actual move keeps his three active pieces, but now his f1-bishop is blocked by his king.
10. Ke2 Ba5
If 10...Rb8 (as mentioned above), planning to get back ahead a pawn after 11. Nxa7 Nxa7 12. Bxa7 Ra8 and 13...Rxa2 after White's a7-bishop moves, doesn't work because White can play 13. Bb6. After 13. Bb6, 13...Rxa2 would lose a piece to 14. Rd8+ Ke7 15. Rxc8.
11. Bc5 Nge7
White was planning 12. Nd6+, after which Black's king would have had to move to the same diagonal as White's c5-bishop or to the same file as White's d1-rook. Then White's d6-knight could have made a capture at the same time as a "discovered check."
But 11...Nge7 blocks the a3/f8 diagonal so that Black's king could hide at the f8-square.
12. b4 Bd8
12...Bxb4 or 12...Nxb4 13. Bxb4 Bxb4 would have moved Black's bishop away from the a5/d8 diagonal, allowing White to play Nc7+. 12...Bb6 or 12...Bc7 also would have failed to prevent Nc7+.
Black's position may look "passive," as none of his pieces is beyond his third rank. But it's not clear how White can improve his position. His c5-bishop and b5-knight have crossed into Black's side of the board, yet White is still a pawn behind.
13. Nd6+ Kf8
13...Kd7 would lose material to 14. Nxf7+.
14. b5
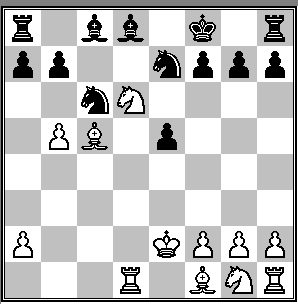
14...Nd4+!
14...Nb8 would have lost a piece to 15. Nxc8, as Black's knight at e7 is "pinned." 14...Na5 would have put the knight where it doesn't attack anything or help defend.
14...Nd4+ allows White to regain the pawn, but only by giving up his dark-square bishop. This is a bargain for Black because he'll be able to move the e7-knight without having to worry about White's bishop giving discovered check.
15. Bxd4 exd4 16. Nf3
White intends 17. Nxd4, to enable the knight to control more squares on Black's side of the board than it does from the f3-square. Also, a knight on the d4-square would be harder for Black to force away from the center than a rook would be. But he probably overlooked Black's reply.
It was hard to imagine how Black's pieces, which had been held back for so many moves, would spring to life. Otherwise, White might have played 16. Nxc8 so that Black would no longer have the "bishop pair."
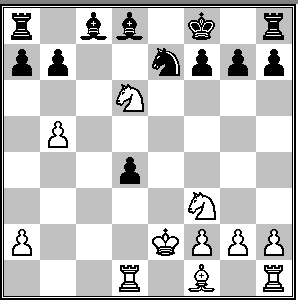
16...Nd5!
The threatened "fork" 17...Nc3+ provokes White into capturing the d-pawn with the rook, despite White's plan to play 17. Nxd4. But 16...Nd5 would be a good move anyway because (1) it puts the knight in the center, (2) the knight at the d5-square will be hard for White to force away, because it can soon be protected by moving the c8-bishop to the e6-square, (3) the h4/d8 diagonal is now clear for the d8-bishop, and (4) the e7-square is now clear for Black's king, which will allow Black's h-rook to come out of the corner.
17. Rxd4 Be6
On this square, the bishop has a potential "discovered attack" on White's a-pawn. White can't now safely play 18. Ng5 (intending to trade the bishop at e6), because Black's d8-bishop would capture it.
18. Nxb7 would risk the knight's getting trapped after 18...Bb6, which would attack the d4-rook while taking away almost all of the knight's safe moves. Then after White's d4-rook moves, 19...Ke7 would keep the b7-knight from coming to the d6-square.
18. Kd1
This allows White's bishop to come out.
18...Bb6
The first of a series of moves in which Black's pieces develop while carrying a threat, which forces White to react rather than continuing his own development. White's rook now retreats to the only square where it protects the f-pawn.
18...Bf6 seems good also. I'd explain how I decided between 18...Bb6 and 18...Bf6, but I can't remember.
19. Rd2 Ke7
Black can win the a-pawn by 19...Nc3+ 20. Kc2 Nxa2, but then White might be able to safely play 21. Nxb7, since the knight can probably escape to the d6-square.
Even though queens were traded long ago, it can be risky for a king to be on a central file. But if White now (after 19...Ke7) plays 20. Nf5+, Black could reply 20...Bxf5. This would leave Black's knight unprotected, and White could play 21. Rxd5, also attacking Black's bishop. But 21...Be6 would "skewer" White d5-rook and a-pawn, and the only rook move that protects White's a-pawn and f-pawn would be 22. Rd2. Then 22...Rfd8 would "pin" White's rook, so that it wouldn't "really" protect either White's a-pawn or his f-pawn. After 22...Rfd8, White would lose material.
After 19...Ke7, 20. Nxb7 would lose the knight after 20...Rab8. 20...Rhb8 would be less good because it would block Black's a-rook.
20. Ne4 Ba5
Coaxing the d2-rook to the d4-square, so that White's f3-knight can no longer move there. 20...Ba5 also makes a possible ...Nc3+ even stronger, since White's king would be facing discovered check if it moved into the e1/a5 diagonal.
Now 21. Rd3 would block White's bishop.
21. Rd4 Rhd8
After 21...Nc3+ 22. Nxc3 Bxc3, White's rook and a-pawn are attacked. But White could protect both by 23. Ra4 or 23. Re4 (which pins Black's e6-bishop).
As long as Black's knight is on the d5-square, one of White's knights needs to keep controlling the c3-square so that it could capture Black's knight if it goes there. But Black's knight could freely move somewhere else. This makes Black's knight almost worth more points than White's knight at e4. That's why Black shouldn't give up his knight unless he gains more in return.
Possible was 21...f5 followed by 22...Nc3+ and 23...Nxa2, but I thought that it was better to bring out at least one of my rooks before trying to capture a pawn. 21...Rhd8 brings a rook to a file that's not only open, but has White's king on it. Having your rook on the same file as the opponent's king or queen often helps you.
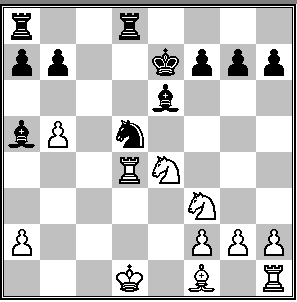
22. Bc4 Rac8!
Black could have won a pawn by 22...Nc3+. If White played 23. Kc2 (moving the king to some other square wouldn't be any better for White), Black would play 23...Rxd4, and after 24. Nxd4, Black would win a piece by 24...Nxe4. Therefore, White must answer 22...Nc3+ with 23. Nxc3. Then, 23...Bxc3 attacks White's pinned rook, and White's bishop is also attacked (since White's rook isn't really protecting it). Therefore, White should play 24. Rxd8, and answer 24...Rxd8+ by 25. Kc2, attacking Black's c3-bishop. After 25...Bxc4 26. Kxc3, Black's bishop can take either White's a-pawn or b-pawn. 26...Bxa2 would allow 27. Ra1, followed by Rxa7... after Black's bishop moves away. The better 26...Bxb5 would allow Black to meet 27. Rb1 by 27...Bc6, not only protecting the b-pawn but controlling the light squares in the center. However, instead of 27. Rb1, White can bring a piece toward the center by 27. Nd4 or 27. Re1+, either of which would make it hard for Black to win.
The text seemed much stronger because I couldn't see how White would avoid losing "the exchange." Black's main threat after 22...Rac8 is 23...Rxc4 24. Rxc4 Ne3+ (double check) followed by 25...Nxc4.
23. Bxd5 Bxd5
23...Rxd5 24. Rxd5 Bxd5 would fork the e4-knight and White's a-pawn, but 23...Bxd5 again avoids further exchanges by the attacking side and is attacking White's e4-knight.
24. Ke2
24. Ned2 Bxf3+ wins a piece after 25. Nxf3 Rxd4+ 26. Nxd4 Rd8 (pinning the knight).
24...Bc4+ 25. Ke3
25. Kd1 Rxd4+ 26. Nxd4 Rd8, and Black again wins the pinned knight.
25...Bb6
After this pin, Black is finally assured of winning "the exchange." But now I wait to capture the rook until the time seems just right.
26. a4 Bd5
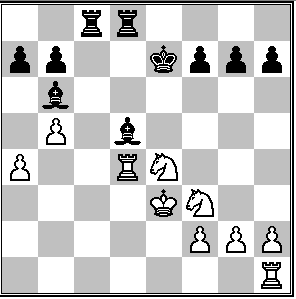
Black plans to play 27...Bxe4 28. Kxe4 Bxd4 29. Nxd4 Rc4, with both rooks attacking White's knight. The only way White could defend it with a second piece is by 30. Rd1, but then 30...Rxa4 would give Black a "pawn majority" on the queenside. This is similar to what actually happens in a few moves.
27. Re1! Kf8!
After 27. Re1, the idea mentioned in the note to Black's 26th move doesn't work anymore. If Black had played 27...Bxe4 28. Kxe4 Bxd4 29. Nxd4 Rc4, he would have lost a rook to 30. Kd3+. Therefore, Black's king moves out of the way.
28. Kf4 Bxd4
Now that White has "broken the pin," Black must take the rook before it can move away.
29. Nxd4
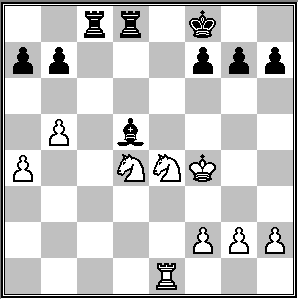
29...Rc4
After 29...Bxe4, 30. Kxe4 would lose a rook after 30...Re8+, so White would have to play 30. Rxe4 instead. Then 30...Rc4 (trying to carry out the same idea as mentioned earlier) would give back the exchange after 31. Ne6+! fxe6 32. Rxc4.
30. Rd1
Moving the d4-knight would have permitted a trade of rooks and minor pieces at e4. Being up the exchange, Black would be happy to trade pieces.
30...Bxe4
Because Black is temporarily ahead by a rook after playing 30...Bxe4, 31. Ne6+ would leave White behind by a bishop after 31...fxe6 32. Rxd8+ Ke7.
31. Kxe4 Rxa4
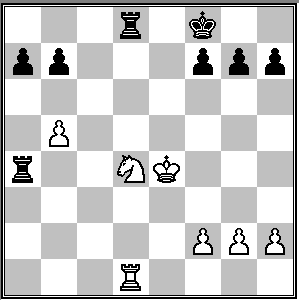
Having thus created a "queenside pawn majority," Black would win easily if all of the rooks and White's knight were to leave the board (by being captured). In the resulting "king and pawn ending," Black could create a "passed pawn" on the queenside. Then, when White's king went over to stop it from promoting, Black's king would move to and capture White's kingside pawns.
32. f4 Ke7
Since White's knight is still pinned, Black has time to make his position even better by moving his king toward the center. When enough pieces have left the board to make it safe for the kings to come out of hiding, the kings can really help their armies.
33. g4 a6
Black is about to create a passed pawn.
34. Ke3 Rdxd4
Since White now had no good alternative to playing 35. Rxd4, it hardly mattered which Black rook captured the knight. But capturing with the d8-rook lines up two attackers against White's f-pawn.
35. Rxd4 Rxd4
Rooks become powerful on an open board, where they often allow the player who's behind to make it hard for the opponent to win. Trading the rooks takes away this chance from White.
36. Kxd4
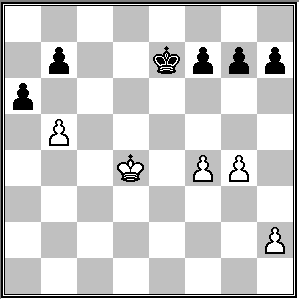
36...Kd6
36...axb5 would allow White's king to become more active by 37. Kc5. Since Black's position is easily won, I mainly wanted to take away any chance White might have.
After 36...Kd6, 37. b6 would be met by 37...Kc6, winning the b-pawn.
37. h4 g6
If White were able to safely move all three of his kingside pawns to the fifth rank (to f5, g5, and h5), and Black's kingside pawns remained at home (at f7, g7, and h7), then White could create a passed pawn after moving his g-pawn to the sixth rank, no matter what Black did after that. (I'll leave it to the reader to figure out how White does this. It's very nice.) Although Black's king could stay close enough to prevent White's passed pawn from promoting, I played 37...g6 so that White couldn't even create a passed pawn.
38. Kc4 axb5+
Black is as ready for this as he ever will be.
39. Kxb5 Kd5 0-1